วันเสาร์ที่ 6 กรกฎาคม พ.ศ. 2556

Internet Connection Problems


Sometimes the problems caused by unintentional human errors
บางทีนะ  ปัญหาก็เกิดจากความผิดพลาดที่ไม่เจตนาของคนเราเองนี่แหละ

Sometimes Internet connection problem can be our frustration. Rather than pressing F5-key and  trying to reload the website when we experience a problem, here are some ways we can troubleshoot the problem and identify the cause.
 

Ensure we check the physical connections before getting too involved with troubleshooting. Someone could have accidentally kicked the router or modem’s power cable or pulled an Ethernet cable out of a socket, causing the problem.

#    #     #  

Ping


Ping  (wikipedia.org) is a computer network administration utility used to test the reach-ability of a host on an Internet Protocol (IP) network and to measure the round-trip time for messages sent from the originating host to a destination computer.

The name comes from active sonar terminology which sends a pulse of sound and listens for the echo to detect objects underwater. 

One of the first things to try when our connection doesn’t seem to be working properly is the ping command. Open a Command Prompt window from your "Start button" using the "cmd" command  and type a command like ping google.com .  


This command sends several packets to the address you specify.
We can see that everything is working fine.
There’s 0% packet loss and the time each packet takes is fairly low.  

คำสั่ง ping จะส่ง packets (ข้อมูลในหน่วยวินาที) ไปยังเครื่องที่เป็นโฮสต์ปลายทาง
จากภาพ จะเห็นว่า คำสั่งทำงานได้ดี  ไม่มีการสูญเสีย packet เลย  คือ ส่งไป 4 ได้คืน 4
และใช้เวลาน้อย 13-25 (เฉลี่ย 18) มิลลิวินาที 


  #    #     #

Modem & Router Issues

 Sometimes our modems or routers can cause the problem of Internet connection. A modem is a device that communicates with your Internet service provider (ISP), e.g. TOT, while the router shares the connection among all the computers and other networked devices in our home network. In my case (and also other students' cases ) , the modem and the router of mine is the same device, so it is called the "modem-router".
 
 Let's take a look at the modem-router. If green lights are flashing on it, that’s normal and indicates network traffic. If we see a steady, blinking orange light, that generally indicates the problem. 


All Green Lights Mean Normality
สัญญาณไฟเขียวตลอดแบบนี้ แสดงว่า ทุกอย่างปกติดี


If the lights indicate that either devices are experiencing a problem, try unplugging them and plugging them back in. This is just like restarting our computer. If we still experience problems, we may need to perform a factory reset on your router (to see its manual). 
 

#    #     #

Our Classroom102

What is about the problem when we are in the classroom? Because the IPaddress conflict can be occurred  anytime, so any computer in the classroom102 can be kicked off easily by the gateway computer of the Media Center which we have to lean on.

Yes, we cannot connect to the Net directly but always request Internet sharing with the server computer of School Media Center through the local area network.

Folder and Printer Sharing


occupatech@gmail.com; picta55@gmail.com
                             http://picta55.blogspot.com

The Atmosphere of My 2003 Computer Class at 4th Floor of Building1.
They were energetic and very nice schoolkids I have ever experienced.

All of us use Windows7 as the operating software, and our computers are connected together within the workgroup of the LAN (local area network). So we should gain the benefit of its sharing capability. Here we go!

1. FOLDER SHARING
        

Be sure we have to specify what folder that we want to share?  


"BOOKS" is the folder of us to be shared.
 Make a right clicking with the folder, the dialogue box appears. Select the "Sharing" tab and the "Advanced Sharing" button

Now the folder has never been shared yet (Not Shared)

 Properties window of the folder appears and we should select to share it with others. Now we can see the maximum number of users to simultaneously enter to the folder is 20. Then we can click on the "Permission" button.

Tick the check-box, and we can change the share name or ignore it.
ติ๊กเลือกว่าจะแชร์  จะเปลี่ยน/หรือไม่เปลี่ยนชื่อที่จะแชร์ก็ได้

After clicking on the permission button, the Permissions window shows up, you can add any user e.g. "student" and you can change the permission type of the user.


We can add user/ specify his permission level.


Finally click on the "Apply" button, the folder now has been shared. 


Well, our folder has been shared.
Sample Special


This is from my computer (Its hostname is "ALPHA00".), when I click on the "Network" (at the left pane of Windows7 "Computer explorer" )  some computer hostnames appears.  Yes, I want to randomly select any hostname. If the target of mine is "KACHATUCH", yes I would make a double-click on it.


My Target Hostname is "KACHATUCH"

The shared folders of the hostname will be appeared. Then we can do a random selection and we can find any other subfolders that we can select to use.


The Shared Folders of "Kachatuch" appears, any folder could be selected.
  If any shared folder had been selected its subfolders would be revealed. 


 2. PRINTER SHARING
        
 Click the "Start button" of Windows7 desktop, the pop-up menu appears, then select "Devices and Printers", the target printer of us will be appeared.

Select the printer

 Make a right click on the printer icon, the select menu will show up, then select "Printers properties" option.  Then we can operate sharing easily.

Select : Printer Properties

Click on the "Sharing tab", and we can rename the sharing printer.

Select the Sharing Tab
   
Select to share

Programming (การโปรแกรม) with Visual Basic 6.0

Programming (การโปรแกรม) with Visual Basic 6.0
          http://picta55.blogspot.com

What is Visual Basic?
วิชวลเบสิกคืออะไร


Visual Basic is a tool that allows us to develop Windows (Graphic User Interface - GUI) applications.  The applications have a familiar appearance to the user.

 Visual Basic is event-driven, meaning code remains idle until it is called upon to respond to some event (e.g. mouse clicking, button pressing, menu selection, ...).  Nothing happens until an event is detected. Once an event is detected, the code corresponding to that event (event procedure) is executed.  
 How to program with Visual Basic? 
Steps in Developing Application 
ขั้นตอนการพัฒนาแอ็ปปลิเคชัน

There are three primary steps involved in building a Visual Basic application:
1.    Draw the user interface  
2.    Assign properties to controls  
3.    Attach code to controls  

Stop Watch Application 

1 At the "Start-up Menu" of our Windows Desktop, let's find where "Microsoft Visual Studio 6.0" is, and click on it. Then we can see some shortcuts to the applications of the software suite, and "Microsoft Visual Basic6.0" is one of them and it is also our "target software" right now, let's select it.

At the "Start-up Menu of Windows", Find where the "Microsoft Visual Basic 6.0" is.


2 We now at the main screen of Visual Basic 6.0 with its "New Project" window. Let's click on the "New" tab and select "Standard EXE" icon.
 
Select the "Standard EXE" icon  

3 Before we go on, let's consider the components of the toolbar of Visual Basic 6.0.  Properties window, Run and Save project are what we have to focus on now.


Design View of Visual Basic 6.0   

4 Controls are the genius tools that can be attached by any codes that can control any events such as clicking mouse or pressing key. Now the "Command Button" and the "Label" are the controls that we are going to use.


Controls of Visual Basic 6.0  
5 Visual Basic programming begins with a form which has been named "Form1" by default. Visual Basic form simulates itself as platform which can receive many kinds of objects that created by the controls. Any object has its properties that has been shown in the properties window.

Form and Controls are variety kinds of object of Visual Basic that have their own properties. 
6 Here we go on creating a design job like the following picture.  
    -  Using the "Command Button" control to draw the three sequence command buttons, Command1,Command2 and Command3. 
   -  Using the "Label" control to draw the six sequence labels, Label1, 
Label2, Label3, Label4, Label5 and Label6 


Form1 would have three command buttons and six labels now.
7 Click on "Form1", we can see its properties, rename it with "frmStopWatch" (frm is a pefix which comes from "form"). And change its caption to "Stop Watch Application".
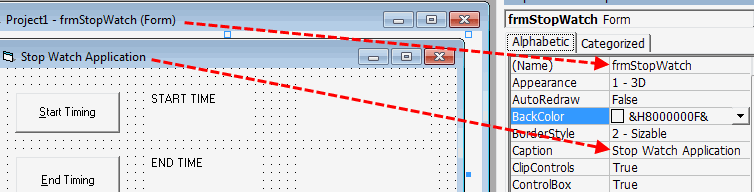

Form1 Properties Configurations  


8 Click on "Command1", yes we are about to specify the properties of this object. Rename it with "cmdStart" (cmd is a prefix which comes from "command button") and also refill its caption with "&Start Timing" (& is a prefix of the key letter that a user can press on this key together with the "alt" key instead of click on this command button). 


Change the properties of the command button :  name and caption
ให้นักเรียนเปลี่ยนชื่อ และแค็ปชันของปุ่มคำสั่ง

9 Do it the same way as the previous step. 
Change the properties of the command button :  name and caption


10 Do it the same way as the previous step.

Change the properties of the command button :  name and caption


11  Change only the captions of Label1, Label2 and Label3 according to the following picture. 
Change the properties of the three labels :   captions 

12  Change the properties of the other last three labels, "Label4", "Label5" and "Label6" by renaming them to "lblStart", "lblEnd" and "lblElapsed" and erase their captions until they are blank.


Change the properties of Label4, Label5 and Label6 according to the picture. 
13  Now we have just already designed and configured all of related objects, the next step of us is coding our program. Let's click on the menu-bar at the "View" command tab, then select the "Code" sub-command, the view-code window will show up. Yes, we are going to enter our source codes of our application here. 


Click on the "View" command at the menu bar, then select "Code" subcommand

14  The first set of source codes is about the declarations. There will be the "(General)" at the left-top of the view-code window and the "(Declarations)" at the right-top. We have to type four lines of our following source codes.


        1st Line is about the General Declaration 
        2nd Line is the Declaration of variable "StartTime" 
        3rd Line is 
the Declaration of variable "EndTime" 

        4th Line is the Declaration of variable "ElapsedTime"
 
15  This step is about attaching our source code to a control object. The "cmdStart" is a command button we are going to attach the source code. Let's double click on this command button, yes, this action could bring us to a module or subprogram that could be driven by an event, _click ( ), that means this subprogram could work when this command button was clicked on. 

 What is about this source code?  It begins with assigning the recent time value (Now) to the variable "StartTime".  Then the method "Caption" stipulates that the label "lblStart" can show up data from the variable "startTime" with the "hh:mm:ss:" format.

  
Attach code to the command button "cmdStart"
16  This step is similar to the previous but it turns to the "cmdEnd" command button. But it creates the expression which assigns the variable "ElapsedTime" with the difference of the variable "EndTine" and the variable "StartTine".

Attach code to the command button "cmdEnd"

17  This is the end of application with the only amazing word "End"
Attach code to the command button "cmdExit"

18  Congratulation to our tough project!. This is the output of our input and process. Yes, it is the "Stop Watch Application" of us.  


Our Graphic User Interface Application :  "Stop Watch"
19  We have to make our project to an independent application.  Click on the "File" command at the menubar then select the "Make..to..EXE" subcommand.   

Visul Basic 6.0 : Exercise แบบฝึกหัด วิชวลเบสิก 6.0


Exercise 1

Calendar/Time Display

1. Design a window application that displays the current month, day, and year.  Also, display the current time, updating it every second (look into the Timer control).  Make the window look something like a calendar page.  Play with object properties to make it pretty.
2. Configure the properties of the related objects like the followings.

Configuration 1

Configuration2

Configuration3

3. Attach the source codes to the objects. There is only the Timer "timDisplay" object that we have to attach our source codes to.  Although there is no any variable declared, but we have to type the code "Option Explicit" at the General Declarations module.